
Gratitude is the best attitude.
Hey Loves! I hope you’re doing well, today I’m going to show how I edit my blog pictures using Photoshop and an alternative option for those who don’t have it at the end of the post. If you’re interested then keep on reading!
You might also like:
OPEN THE IMAGE
Once you’ve opened Photoshop, open the image you’re going to edit (File > Open).
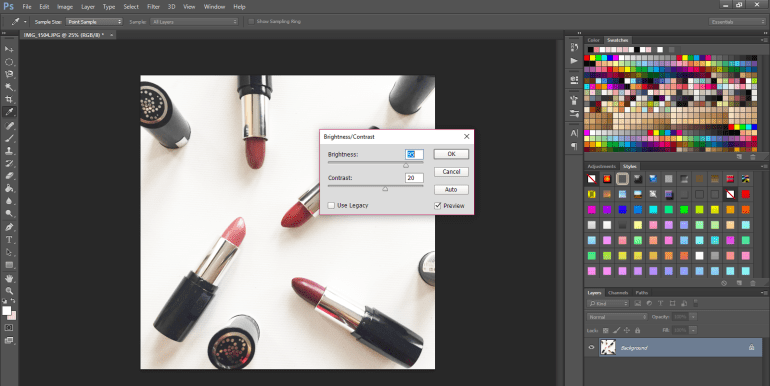
BRIGHTNESS & CONTRAST
The first thing I do is edit the brightness and contrast level of the picture (Image > Adjustments > Brightness/Contrast), I don’t have a specific number – I just choose something that I think looks the best, I don’t want the picture to look too bright or under exposed.
LEVELS
This one is optional but for some pictures, it can be a crucial part depending on the tone of the picture, if you’ve a yellowish or blueish picture then editing the levels of the picture (Image > Adjustments > Levels) will make a huge difference.

SATURATION
Then I edit the saturation of the picture (Image > Adjustments > Hue/Saturation) to make the colours pop up.

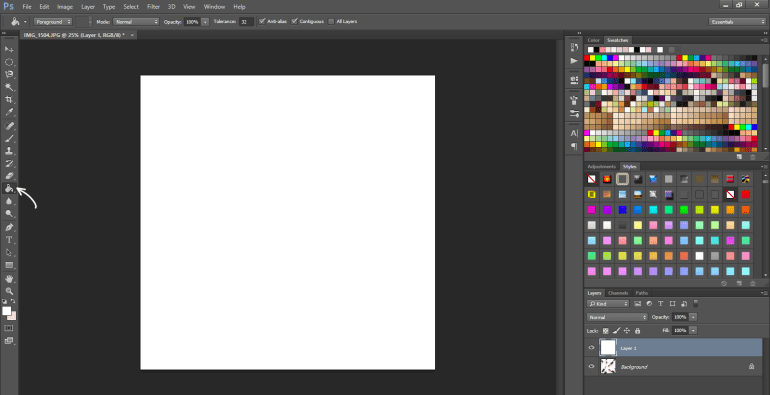
CREATE A NEW LAYER & FILL IT WHITE
After I’ve edited all the basic settings, I create a new layer (Shift+Ctrl+N) and fill it with white colour using the Paint Bucket tool.
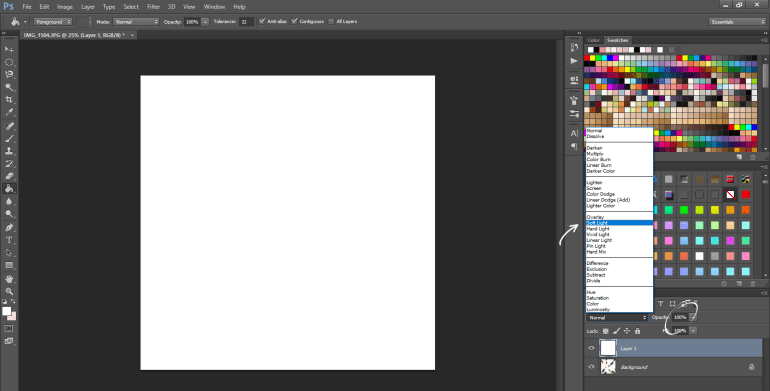
CHANGE THE BLENDING MODE TO SOFT LIGHT
I change the blending mode to Soft Light and afterwards, you can edit the opacity of the layer depending on your preferences. I like to keep it at a minimum level, less than 20 in general. Then I save the picture!
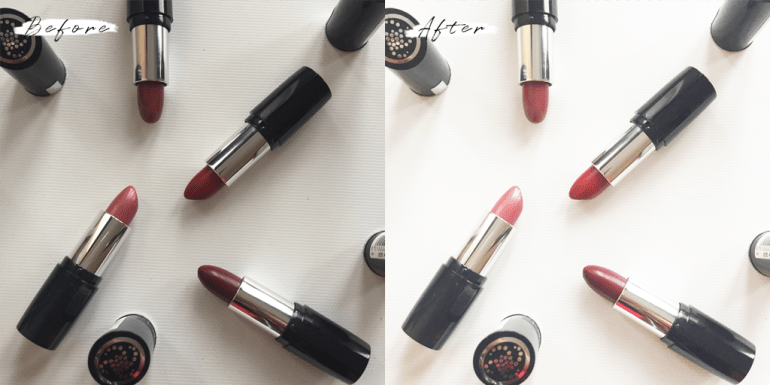
BEFORE & AFTER
AND it’s done! As you can see, here is a before and after picture!
ALTERNATIVES
Photoshop is quite expensive and isn’t accessible for everyone so for those who don’t have it, you can achieve the same effect using some apps on your phone. Here’s a couple of my favourite apps that are similar to Photoshop when it comes to some of the settings:
✘ VSCO CAM
✘ Facetune
✘ Enlight
✘ Lightroom
✘ Photoshop
THANK YOU SO MUCH FOR READING!
xo N

this is so helpful! your pictures are amazing x
Aw thank you so much! Glad you found it helpful x
Ahhh!!!! THANK YOU SO MUCH! This is super helpful! Thank you for sharing!
My pleasure lovely! So glad you found it helpful ❤️
Looks really professional. Making us other bloggers look bad 😂
Thank you love! And you’re way too kind! 🙈💗
Makes me want to up my game as I feel left behind 😂
I feel like I need to improve my blog photography and up my blogging game as well, all the bloggers are so creative and their contents are amazing! So don’t feel like you’re left behind 🙈😂
Oh wow!
💗💗
I really want to get photoshop. It’s such a fab resource to have. When I do I’ll definitely come back and re-read your post!
Samantha x
http://thebeautyspyglass.com
It’s such a great program, I’ll 100% recommend it! Worth the money! x
Thank you for sharing this xx
My pleasure hun! xx
That was helpful. Thanks
Glad you found it helpful! x
Reblogged this and commented:
A brilliant tutorial!
Thank you ❤️
Thanks! Really useful!
My pleasure! So glad you found it useful x
I never thought you can make such a difference on a post quality with pictures. Very useful, thanks 🙂
Thanks a lot! 💗
Amazing post! Thanks for sharing xx
Thank you gorgeous! xx
This is great tips. I’m waiting for one for we android users though 😌😝😆
Thank you dear! Haha I’ll try my best to find a good app for Android users as well 😅💗
💃 💃 💃 u wlc
❤️❤️
Hey girl!
Great post ThnQ You for sharing Dear!
Have a nice week!
-Miss B.-
Thank you love! Have a lovely weekend ❤️
ThnQ Dear 😄💋
💗💗
This is sooo helpful!!!! Thank you so much! I need to try this out ! X
My pleasure! So glad you found it helpful x
Snapseed is also a great option too for everyone who likes editing photos on their phone! It’s made by Google I believe.
We use similar techniques but I’ll have to try out the Soft Light one. I like to use Curves as well as Brightness & Contrast. Both are really great options, especially if you’re editing a dark photo which we all know is necessary in the UK, haha!
I love Snapseed too! It’s such a great app but I haven’t used it in awhile though, I should try it back 🤔
Haha exactly! But it’s not really gloomy and foggy anymore here in the UK (knock on wood) so it’s a lot easier to take pictures and to edit them!
Very helpful ! How do you change the levels ? And I didn’t know about adding a new white layer, it looks really nice !
Thank you Caroline! To change the levels, drag the black and white sliders (little arrows) and the histogram (graph) will start to move. You can adjust other levels (RGB) as well such as red, green and blue. Just play around with it and you’ll see a difference with the levels! x
THanks !! 🙂
💗💗
Thanks for sharing, this is going to be helpful for me.. 😊
My pleasure Tracy! 😘
I needed this! I’m so bad at taking photos, thank you so much😊
My pleasure Emma! 💗
Thanks for sharing such a useful posts
That’s my pleasure! 😘
Looks amazing. Thank you for the tips. Your pictures are fabulous x
Aw thank you doll! x
This is very helpful-thanks for sharing!
Glad you found it helpful!
Thanks for sharing. I no longer have Photoshop – that was 2 or 3 computers ago when I could write off the cost. But I still miss it. Glad to see some alternatives. Will definitely try them.
My pleasure! I know Photoshop is quite expensive but the alternatives I’ve added are just as good, hope you’ll like them! x
Nice clear instructions for the tutorial, and I love your photos. The composition is excellent; really interesting and professional results.
Thank you so much!
Thank you so much, as always your posts are always helpful x
My pleasure! Thank you, you’re too kind! x
Hey – excellent post. Adding a second, white layer is a great tip. Question, what kind of camera do you use? Your phone or something else?
Because I’m new to the blogging world, I’ve been using my iphone and vsco cam to edit. It’s a very comprehensive app with tons of features (even the free version), I’m pretty impressed. I wonder if it does the layer thing though – that would come in super handy.
Thank you! I only use my iPhone 6 to take my blog pictures. VSCO Cam doesn’t do the layer option but the settings are pretty much very similar to Photoshop!
Reblogged this on Random Repeat.
Thank you ❤️
Thank you
This was helpful. Thank you 🙂
Glad you found it helpful! x
Thank you for sharing these tips! It takes so much practice to get the editing done a certain way – but you have perfected it!
Aw my pleasure! Thank you for your kind words, you’re such a sweetheart 😘💗
Thank you so much for this post.
I have never seen anyone explaining it in details. You’ve got a new follower 🙂
Aw my pleasure! Thank you so much! ❤️
Oh thank you so much for sharing this info which is gonna helps a lot
You’re welcome! So glad you found it helpful x
Your pictures are always so clear! What do you use to take them??
Ahh thank you! I use my iPhone 6 x
Wow, really nice tips. Thanks for the tutorial.
Thanks a lot!
This is so helpful a post. I really appreciate the way you painstakingly write detailed posts that would be easy for us to try out. Thank you😘
http://Thechicstreetlawyer.wordpress.com
Thank you! Glad you found it helpful! 💗
Reblogged this
Loving the tips you’re giving on your blog. I recently just started my own blog and would love if you stopped over there sometime to check it out and give me some feedback if you’d like. In the meantime, I’m following you✨
As a photographer I have always used Lightroom. Photoshop is much tougher for me to grasp, but it has a few features that I’d love to try.
I don’t have the desktop version of Lightroom, I only have the free app on my phone but I heard a lot of people say it was amazing!
Just awasome post
Thank you!
My pleasure
💗
Thanks for sharing this post! Have you ever used lightroom presets?
My pleasure! No I haven’t x