
There are so many amazing photo editing apps out there and VSCO Cam is one of them! It’s such a great app, there are so many tools and filters. In today’s post, I want to share with you on how to create a beautiful feed using VSCO Cam in an in-depth tutorial, plus I’ve shared 10 filter settings!
Il existe de nombreuses applications de retouche photo incroyables et VSCO Cam est l’une d’entre elles! C’est une si bonne application, il y a tellement d’outils et de filtres. Dans le post d’aujourd’hui, je souhaite partager avec vous la création d’un flux magnifique à l’aide de VSCO Cam dans un didacticiel approfondi. De plus, j’ai partagé 10 paramètres de filtre!
You might also like:
- 5 Apps You Need To Edit Your Instagram Pictures
- How To Use Instagram For Your Blog
- 7 Photo Editing Apps To Up Your Instagram Feed
FILTERS
VSCO Cam is known for its filters, they have a huge range of filters which some of them are free whilst others are paid (but still affordable). If you’re serious about your blog photography or Instagram feed then I’d recommend to invest in some of the paid filters. But personally for me, they aren’t necessary. If you play around with the settings you can definitely come up with your own version of filter up to your preference. Also, you can use other apps to help you achieve that look.
VSCO Cam est connu pour ses filtres, ils ont une vaste gamme de filtres dont certains sont gratuits tandis que d’autres sont payants (mais toujours abordables). Si vous êtes sérieux au sujet de la photographie de votre blog ou du flux Instagram, je vous recommande d’investir dans certains des filtres payants. Mais personnellement pour moi, ils ne sont pas nécessaires. Si vous jouez avec les paramètres, vous pouvez certainement créer votre propre version de filtre selon vos préférences. En outre, vous pouvez utiliser d’autres applications pour vous aider à obtenir ce look.
My favourite filters: A4, A5, A6, F2, HB1 and HB2.
TOOLS

Exposure: This is one of the best exposure tool I’ve come across in an app. If your pictures aren’t bright enough or have a bad lighting then use this tool to brighten up your pictures.
Contrast: If you use the exposure tool, you’ll have to edit the contrast levels as well from that way the picture will be balanced otherwise the picture will be too bright. The contrast tool is used to darken and bring balance to your pictures.
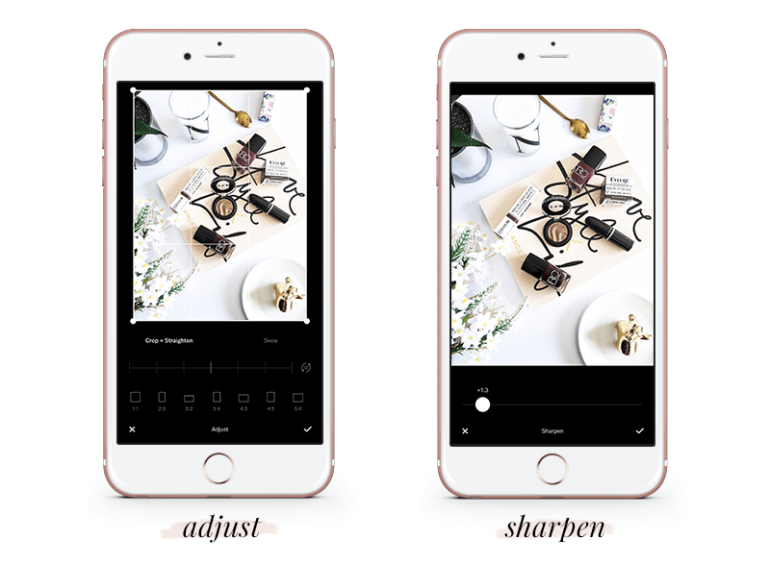
Adjust: You can crop and straighten your pictures using this tool.
Sharpen: As its name, you can sharpen your picture using this tool but try not to overdo it as it will give a ‘fake’ look.
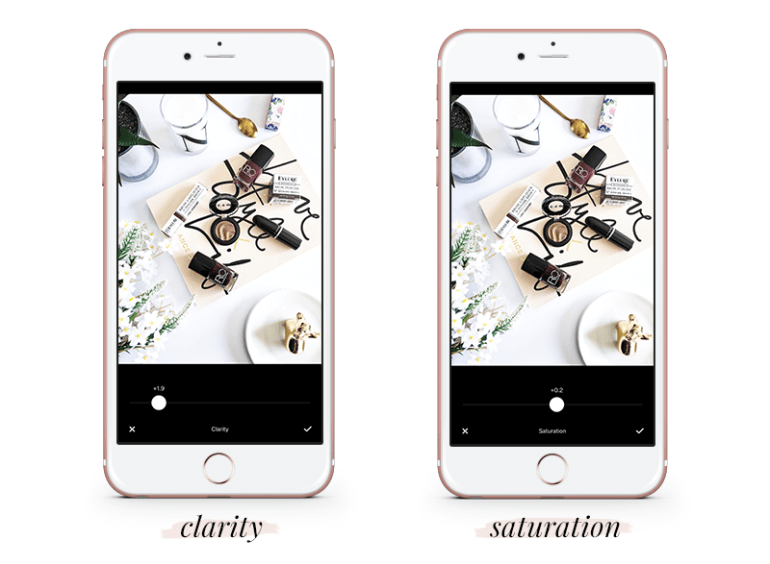
Clarity: This tool will accentuate the sharpness of the picture, a little goes a long way for this tool.
Saturation: The saturation tool is used to balance the colour levels of the pictures, you can either saturate or de-saturate the picture depending on your preference.

Tone: You can edit the highlight and shadow levels of the picture using this tool.
White Balance: My favourite tool! You can adjust the temperature and tint levels of the picture. With the temperature, you can either make the picture warm which will add yellow tones or make it cooler which will add blue tones to the picture.

Skin Tone: This tool is used for the face but you can use it for outdoor and flatlay pictures as well. It will add a subtle smoothness to the picture without being over the top.
Vignette: If you want to add some vintage effect to your pictures, this is the tool you need! It will add shadows around your picture as a border.

Grain: If you were searching on how to add some cool grain effects to your pictures then this is what most people use!
Fade: This tool will decrease the brightness of your picture and add shadows with a fading effect as its name.

Spilt Tone: Another favourite tool of mine! You can accentuate certain colours using this tool so if you have a theme based around a specific colour then this will come in handy! You can accentuate and add colours to your picture in terms of highlights and shadows as well.
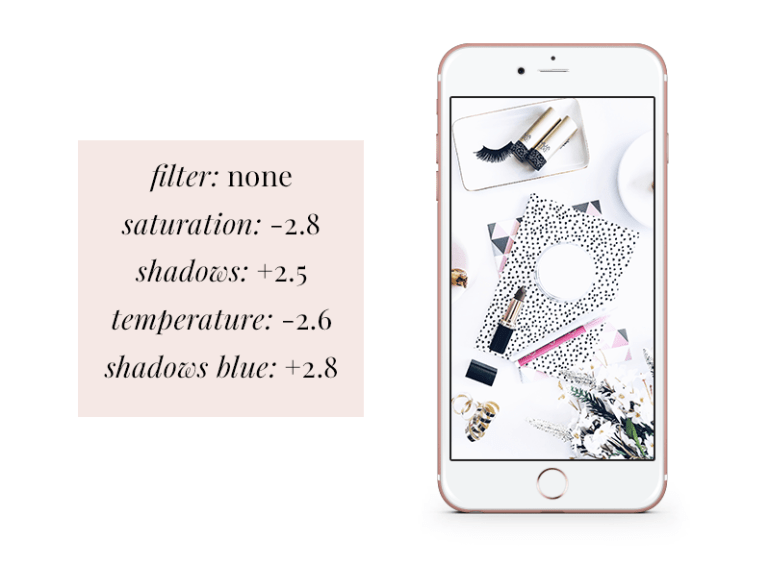
Here is an example of a picture I edited using VSCO Cam!

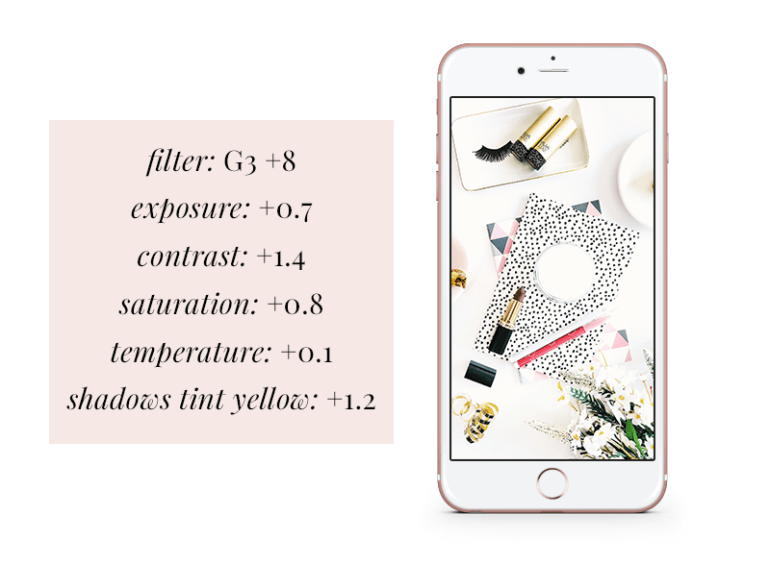
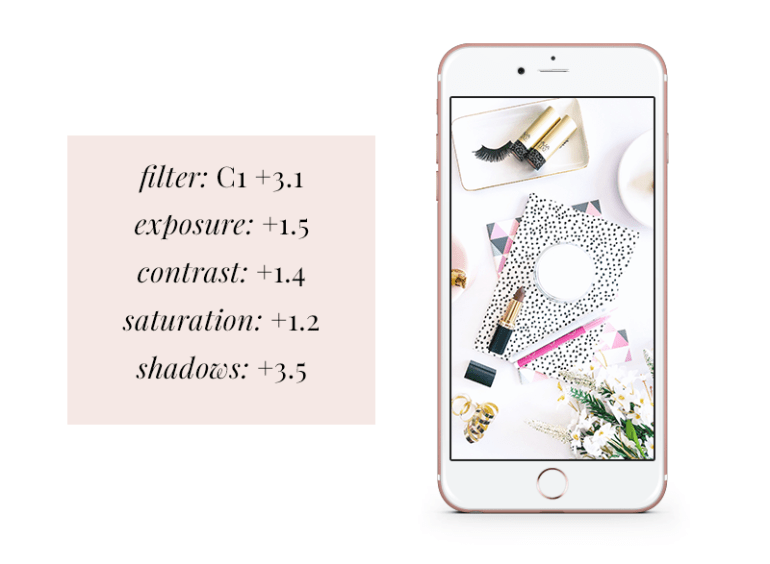
FILTER SETTINGS
Here are some filter settings! If you like the editing of one of these pictures, feel free to copy and use these settings.
Voici quelques paramètres de filtre! Si vous aimez l’édition de l’une de ces images, n’hésitez pas à copier et utiliser ces paramètres.


THANK YOU SO MUCH FOR READING!
xo N

VSCO is also one of my fave editing apps. I always use HB1 & 2 but the A range looks so good! May try switching up from time to time now!
Kirsty x
http://kirstyjarvie.com
I love HB1 & 2 as well! Thanks for reading lovely x
Amazing tips👏🙌💐🌹
Thank you love 😘💗
VSCO is one of my fav editing apps too! Great tips. 👌😌
Thank you Minnu! ❤️
Very helpful post 💞
Thank you Parnika! So glad you found it helpful 💗
Awesome! Thanks for sharing! 💕
Thank you! You’re welcome ☺️
Needed a post like this very helpful thanksa
Thank you sweet! Glad you found it helpful x
I’m always interested in easy photo editors, I think I will give it a try! Thanks x
You’re welcome hun! x
Great post, I love VSCO, I actually never noticed they had an option to fix the “White Balance”, I’ll definitely check it out when I edit my photos!! I love how your flatlay looks!
Thank you so much lovely! Yess! It’s such a great tool x
Thanks for sharing, nice and useful info!!
My pleasure! Thank you x
I’m not a beauty blogger, but I really enjoy your posts. Thanks so much for sharing all of your tips! Always helpful! 💜
Aw thank you so much! It means a lot to me ❤️
Nice post
Thank you!
Welcome
Love VSCO! Lightroom is also a great free app
I love Lightroom as well! I already mentioned it in one of my blog posts, it’s such a great app x
i have this app
It’s really good isn’t it!
Yes…I need to send u my VSCO link…
I’m sure I downloaded this app a while back! I’ll have a look and refer back to your tips and advice. Thanks for sharing lovely lady x
Samantha | thebeautyspyglass.com
My pleasure hun! x
I’ll have to try VSCO, I’m currently using acolorstory but am always open to new apps! ❤
A Color Story is amazing as well! 💗
I just found your blog even though I’ve followed you on IG for a while now! VSCO is my favourite photo editing app, because you can do so much with it. A5 and HB2 are two of my go-to filters, too!
I love these two filters as well! Thanks for reading hun x
An amazing post! This is really helpful! I used to play around with this app a while back and since getting a new phone, totally forgot about this editing app! I just downloaded it again! Thank you for such a helpful post!
Thank you so much! So glad you found it helpful ❤️
Amazing post! Love how you’ve showed step by step of editing a photo.
http://www.fashionradi.com
Thank you Radi! 💗
Thanks for the great tips. I also use this editing app but I have learnt new things😊
My pleasure lovely! ☺️
Great tips ☺️
Thank you 😘
Ur such a lifesaver thanks so much for sharing!
This is super helpful for people who live in gloomy areas where theres hardly any good natural lighting
Thanks again!! 😍
Kiki | soyvirgo.com
My pleasure babe! ❤️
Thanks for sharing these tips. Very helpful indeed. I tried out a couple of the filter settings you listed and the pics look awesome.
My pleasure! Glad you found them helpful! Ahh I’m so glad x
VSCO and ColorStory are my go to apps for quick photo edits and I’m always happy with the results!
I know right! They are literally the best! I like Afterlight and Lightroom as well x
Thank you for this post! I will have to look into this. My photography skills are an embarrassment, but I need to learn for the blog.
My pleasure! I’m pretty sure your skills are good, don’t be hard on yourself. It took me ages to take good pictures and I still have a lot to improve x
Thank you 🙂 Agreed. It is not an easy skill to improve.
💗💗
Thank you so much for sharing your tips, your photography is always so stunning! Great post, really useful ❤ xx
Bexa | http://www.hellobexa.com
Aw thank you so much babe! It means a lot to me ❤️
Great tips
Thank you! 😊